Manual Credit Requests let you dispute an alert by sending evidence that shows the alert was wrong.
If your request is approved, we’ll return the full alert cost as a credit to your Balance.
This process is different from Automatic Credit Requests (also called System Credit Requests). See the related guide for details.
Eligibility
You can request a credit for alerts with one of these statuses: Lost, Already a Chargeback, Failed Transaction, Previously Refunded, or Not Found.
See the Alert Status Reference Guide for details on each status.
To qualify, you must also meet these conditions:
- You have an active Chargeback.io account that received the alert.
- The alert is less than 14 days old.
- Your role is Owner, Admin, or Manager.
- You did not refund the customer directly through your payment processor.
- No other credit request exists for the same alert ID.
⚠️ Credits for 'Lost' alerts are only applicable if you could not find a transaction that matches the 'Lost' alert in your dashboard.
How to File a Manual Credit Request
Step 1: Open the Alert
- In the sidebar, select Alerts.
- From the dropdown, choose All.
- Use filters to find alerts received within the past 14 days:
- Date: Set the range to 14 days or less.
- Status: Select Already a Chargeback, Not Found, Failed Transaction, or Previously Refunded.
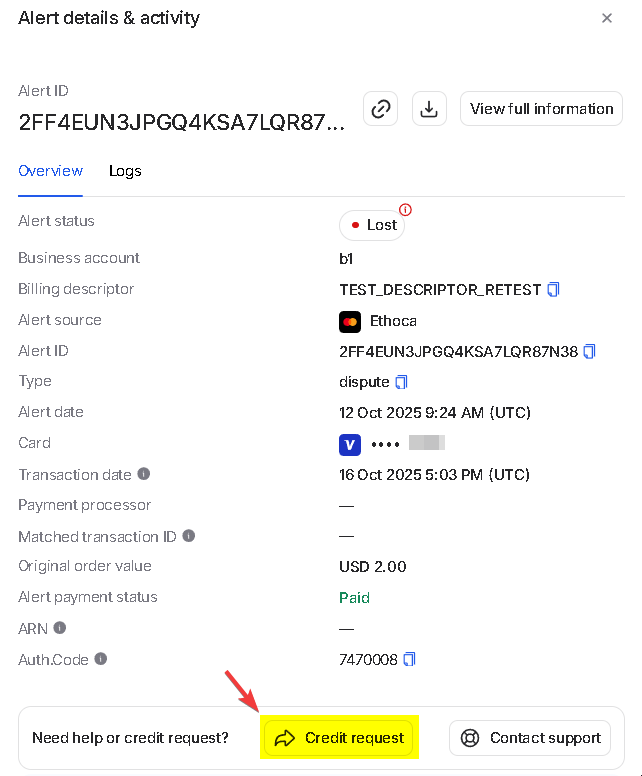
- Click the alert you want to review.
- In the alert details window, select
Credit Request.
Step 2: Submit the Evidence
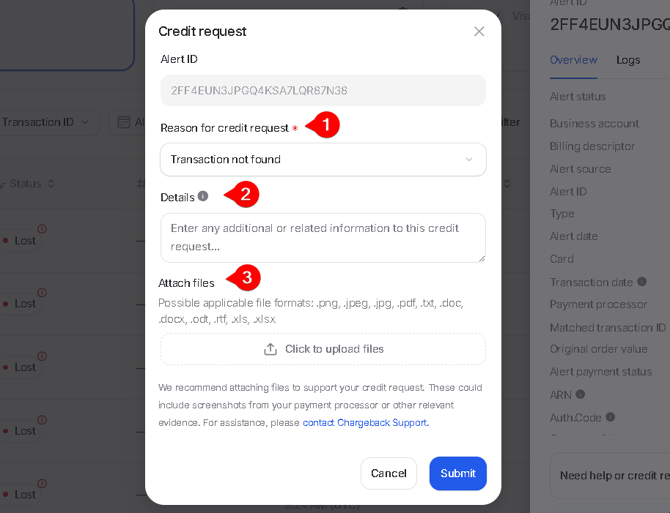
- Complete the Credit Request Form:
- Reason: Choose why you’re disputing the alert:
- Transaction was not found
- Transaction was refunded before the alert
- Transaction became a chargeback before the alert
- Alert went to failed / not authenticated transaction
- Other
- Details: Add extra context if needed (required when selecting “Other”).
- Attach File(s): Upload at least 1 supporting document.
- See "What Evidence Do I Need" for details.
- Reason: Choose why you’re disputing the alert:
- After completing all fields, click
Submit.
Manual Credit reviews can take up to 5 to 10 business days because we need to wait for approval from Verifi and Ethoca. We cannot speed up this process.
In the meantime, pending requests will appear as 'non-billable'. This doesn't mean it was approved. We are working on changing this status.
⚠️ After submitting, you can’t make any changes or submit another request until we reviewed the request. Double-check your information before sending.
How to Track Your Credit Status
You can track the progress of your credit request by:
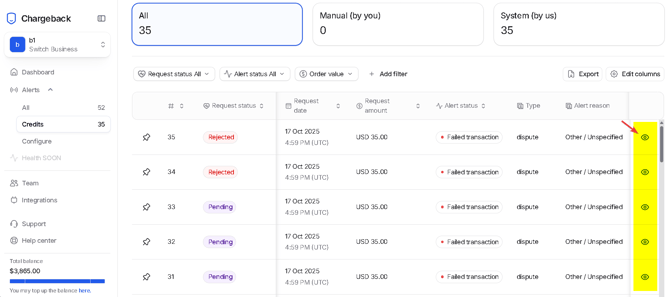
- Selecting Alerts from the left sidebar.
- Choosing Credits from the dropdown menu.
- Checking the Request Status column for the current status.
- Clicking the eye icon on the right to view full submission details.
ℹ️ You will also receive automated emails from us when your credit is Approved or Rejected.
Step 3: If Your Request Is Rejected
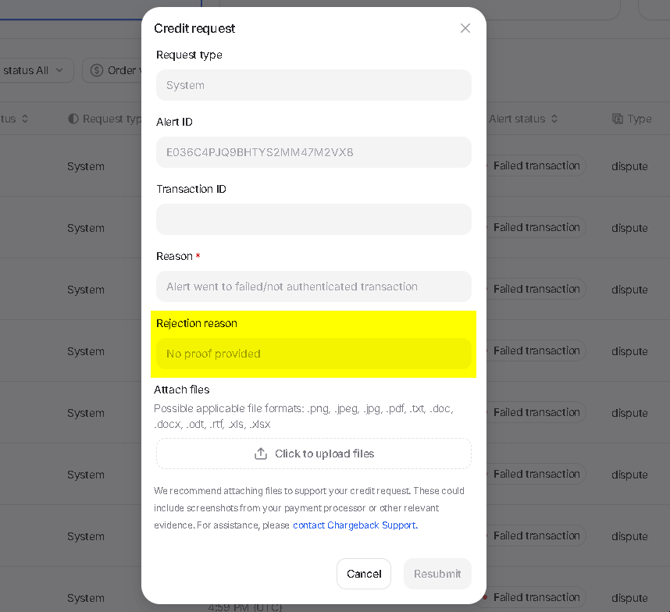
If you receive a rejection email or see a Rejected status in your dashboard, you can revise and resubmit the request with new evidence (up to 3 total submissions).
A request may be rejected for reasons such as:
- The selected reason was invalid.
- No evidence was attached.
- The attached files didn’t meet format or size requirements.
- The alert didn’t qualify for a credit.
- Other (explained in your rejection email).
Each rejection email includes the reason, so you’ll know what to correct before resubmitting. Review the notes, update your evidence, and submit the request again.
This screenshot is an example of what your dashboard will look like if a Credit is rejected.
How to Interpret Request Statuses
You can check the progress of your request in the Credits page. Each status means the following:
- Pending: Your request has been submitted and is under review.
- Approved: Your request was accepted, and the credit has been applied to your account.
- Rejected: Your request was denied. Previous files remain downloadable for reference.
- Reopened: You resubmitted a previously rejected request. The system automatically updates this status after you submit again.
What Evidence Do I Need?
Before submitting a Manual Credit Request, make sure your evidence meets the requirements below:
- Submit within 14 days of receiving the alert.
- Upload at least 1 file (maximum 20).
- Accepted formats:
.png,.jpeg,.jpg,.pdf,.txt,.doc,.docx,.odt,.rtf,.xls,.xlsx.
Every screenshot or document must clearly show your business name or merchant account ID.
For the statuses Already a Chargeback, Previously Refunded, Failed Transaction, and Declined, each screenshot must include at least three of the following details to identify the transaction:
- Card brand
- Last 4 digits of the card number
- Transaction amount
Here are more details on what to include for each status:
| Status | What Evidence Must Show |
| Already a Chargeback | Chargeback date and reference showing it occurred before the alert. |
| Previously Refunded | Refund date and confirmation showing it was processed before the alert. |
| Failed Transaction | Processor or bank record showing the payment failed or was not authenticated. |
| Declined | Processor or bank record showing the payment was declined. |
| Not Found | Screenshot of search results or transaction history showing no matching transaction for the alert. |
| Lost | Same rules as 'Not Found'. |
Screenshot Examples
If you use Stripe and Shopify, use the screenshots below as references.
1. Already a Chargeback
1A. Stripe Example

1B. Shopify Example

2. Previously Refunded
2A. Stripe Example

2B. Shopify Example

3. Failed Transaction
Shopify does not support a “failed transaction” status. Below is an example from Stripe.
4. Not Found
4A. Stripe Example

4B. Shopify Example

💡 Questions or concerns? Get help from our support specialists at Chargeback.io.